Drawing Lesson I: How to Draw the Six Days of Creation for Kids - Part II
Lessons
- Drawing Lesson I: How to Draw the Six Days of Creation for Kids - Part I
- Drawing Lesson I: How to Draw the Six Days of Creation for Kids - Part II
- Drawing Lesson II: Teaching Children Concepts of Creation
- Drawing Lesson III: How to Draw a Dinosaur
- Drawing Lesson IV: What Happened to God’s Perfect Creation?
- Drawing Lesson V: Two Trees of the Gospel
For the next several weeks we will share a number of step by step drawing lesson/presentations for teaching children some important concepts about Biblical creation.
Drawing skill level:
These presentations are designed to be very simple to draw so you don’t have to be an artist to present them. They are also simple enough for kids to draw along with you on their own sheets of paper.
These lessons can be presented to an audience using an overhead projector, chalkboard, or markerboard.
The first presentation in this series is given to you in two parts. It is a simple method of teaching the order of the six days of creation so children (and adults too) will remember them. View the first lesson.
An accompanying animation demonstrates the drawing progression for this lesson.
Drawing tip for part II:
A different color marker would be nice for this half of the lesson. It’s not necessary, but a second color makes it possible to separate what was made on the first three days versus the last three days of creation.
Don’t reach for a new sheet, because we will continue to draw on the same page. The work we’ve done drawing Days One through Three in the first half of this lesson has prepared us for what comes next in Days Four through Six.
1. Day Four (Genesis 1:14–19)

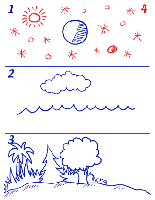
Move back to the top area of the page. Write a number 4 in the upper right corner of the top area. This is for creation Day Four.
On Day Four, we will show four main things God created to place in space:
Sun - Light bearer from that day on. Draw it on the light side of the Earth.
Moon - Draw it on the dark side of Earth.
Planets - Draw small circles distributed in space.
Stars - Draw little asterisk type stars around in space. These are easier to draw than the five pointed stars.
2. Day Five (Genesis 1:20–23)

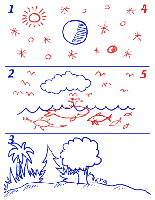
Move back to the middle area of the page. Write a number 5 in the upper right corner of the middle area. This is for creation Day Five.
On Day Five, we will show God created the creatures that live in the sky and the sea:
Flying Creatures
Draw little “m’s” around the cloud for the flying creatures. Explain that the flying creatures were not only birds, but also flying reptiles and mammals. Have the kids name examples of different kinds of flying creatures.
Examples are: parrots, eagles, bats, pterodactyls and butterflies. For older children, you may want to draw some bats and flying reptiles.
Sea creatures
Draw simple 2 line fish under the waterline. Explain that the sea creatures were not only fish, but also swimming reptiles, mammals and other types of sea life. Have the kids name examples of different kinds of sea creatures.
Examples are: whales, octopus, star fish, coral, sea turtles, plesiosaurs, sharks, and trout. For older children, you may want to draw some other types of sea creatures.
3. Day Six (Genesis 1:24–31)

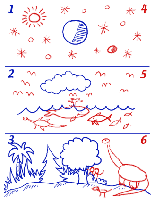
Move to the bottom area on the page. Write a number 6 in the upper right corner of the bottom area. This is for creation Day Six.
On Day Six, we will show God did two main things.
* He created land animals - Draw a simple dinosaur (see animation) and a dog on the right side of the land area. Have the kids name examples of different kinds of land animals. Examples are: dinosaurs, lizards, cats, dogs, rabbits, deer, bear, sheep, cattle and elephants.
* God created the first two people. A man (Adam) and a woman (Eve). Stick people are fine to draw. You may want to draw them behind a bush.
If the kids have been drawing along with you on their own sheets of paper, it might be good to give them some time to draw in more animals on Days Five and Six. At the end of Day Six, God looked at everything He had made and called it “VERY GOOD”! Genesis 1:31

Answers in Genesis is an apologetics ministry, dedicated to helping Christians defend their faith and proclaim the good news of Jesus Christ.
- Customer Service 800.778.3390
- Available Monday–Friday | 9 AM–5 PM ET
- © 2026 Answers in Genesis


