
Criss-Cross
Day Three Craft
on July 23, 2018Option One: Juniors & Primaries
Materials
- Corrugated cardboard, two 4½x6-inch pieces per child
- 9x12-inch craft foam, 1 sheet for every 4 children
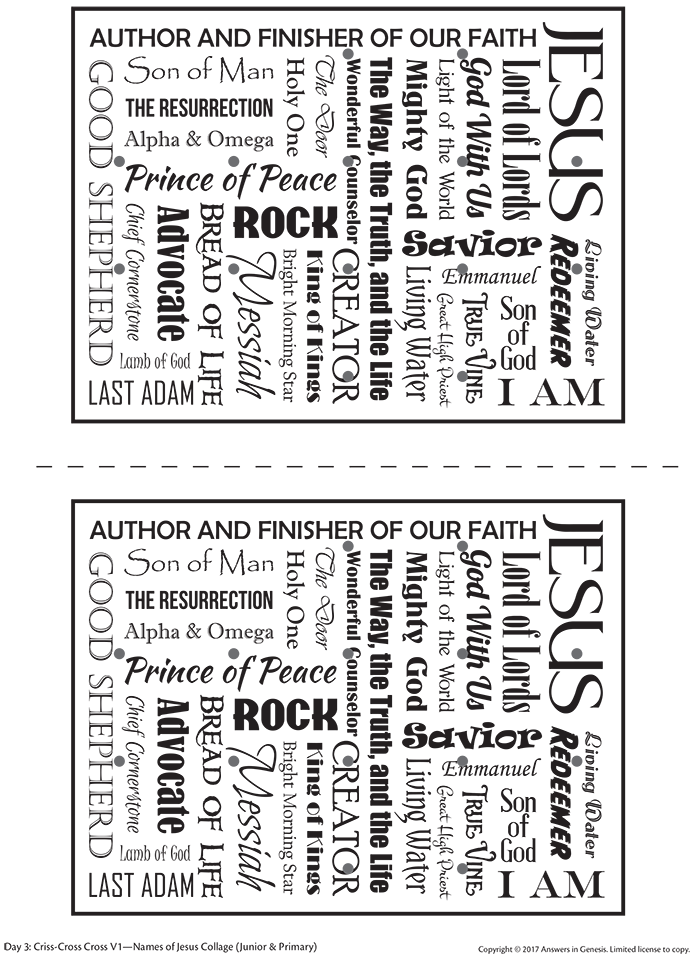
- Names of Jesus pattern (download below)
- Brightly colored card stock, 1 sheet for every 2 children
- Clear push pins, 14 per child
- Rainbow loom bands, 31 per child
- Colored masking tape, 25 inches per child
- Zippered baggies, 2 per child
Tools and Basic Supplies
- Office paper cutter or utility knife and straight edge (adults only)
- Craft glue
- Glue sticks
- Scissors
Pre-Prep
- Using a paper cutter, or utility knife and straight edge (adults only), cut cardboard into 4½x 6-inch pieces, 2 per child.
- Glue 2 cardboard pieces together with craft glue, 1 set for each child.
- Wrap the edges of each cardboard set with colored masking tape.
- Cut the craft foam into 4½x 6-inch pieces, 1 per child.
- Photocopy the Names of Jesus pattern onto brightly colored card stock and cut out 1 per child.
- Place 14 clear push pins into a zippered baggie for each child.
- Place 31 rainbow loom bands into zippered baggies for each child.
Teaching Tie-In
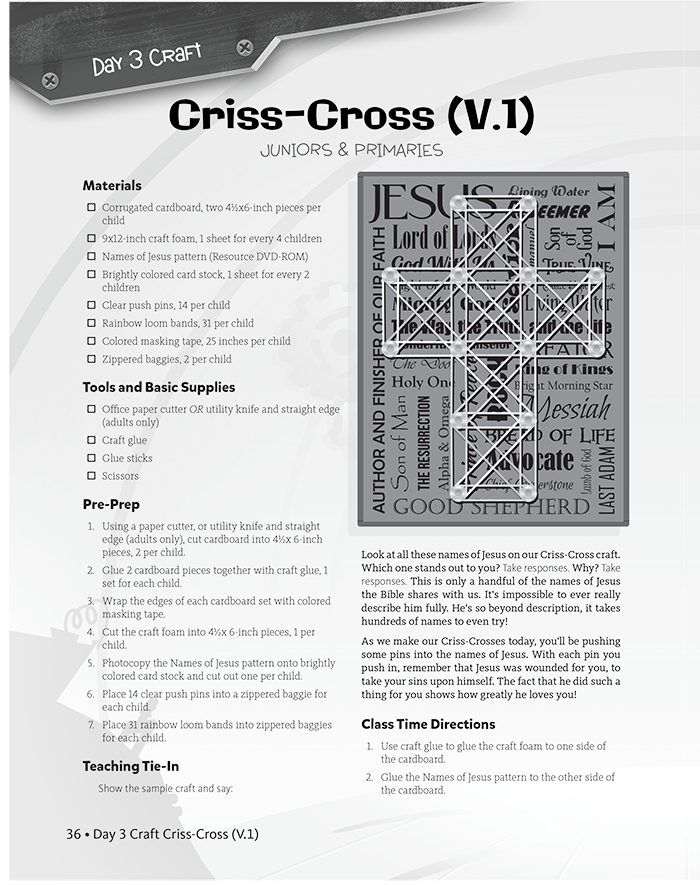
Look at all these names of Jesus on our criss-cross craft. Which one stands out to you? Take responses. Why? Take responses. This is only a handful of the names of Jesus the Bible shares with us. It's impossible to ever really describe him fully. He's so beyond description, it takes hundreds of names to even try!
As we make our criss-crosses today, you'll be pushing some pins into the names of Jesus. With each pin you push in, remember that Jesus was wounded for you, to take your sins upon himself. The fact that he did such a wonderful thing for you shows how greatly he loves you!
Class Time Directions
- Use craft glue to attach the craft foam to one side of the cardboard.
- Glue the Names of Jesus pattern to the other side of the cardboard.
- The Names of Jesus pattern contains 14 gray dots outlining a cross. Carefully push 1 clear push pin straight down through each gray dot. After the push pins are in place, leave them alone so they won’t loosen their grip on the cardboard.
- Stretch 1 loom band horizontally around the top left and top right push pins.
- Continue adding loom bands horizontally to the corresponding push pins all the way down.
- Now add loom bands to form the outline of the cross.
- Add 2 vertical loom bands to form a square in the center of the cross.
- Notice that your cross consists of 6 loom band squares. Now take the remaining loom bands and stretch them diagonally to form an “X” within each square, finishing your cross.
Tip Corner
- As an alternative to zippered baggies for each child, simply place push pins and loom bands in bowls on each table.
- A scroll saw or band saw works well for cutting corrugated cardboard (adults only).
Option Two: Pre-Primaries & Toddlers
Materials
- Corrugated cardboard, one 4½x6-inch piece per child
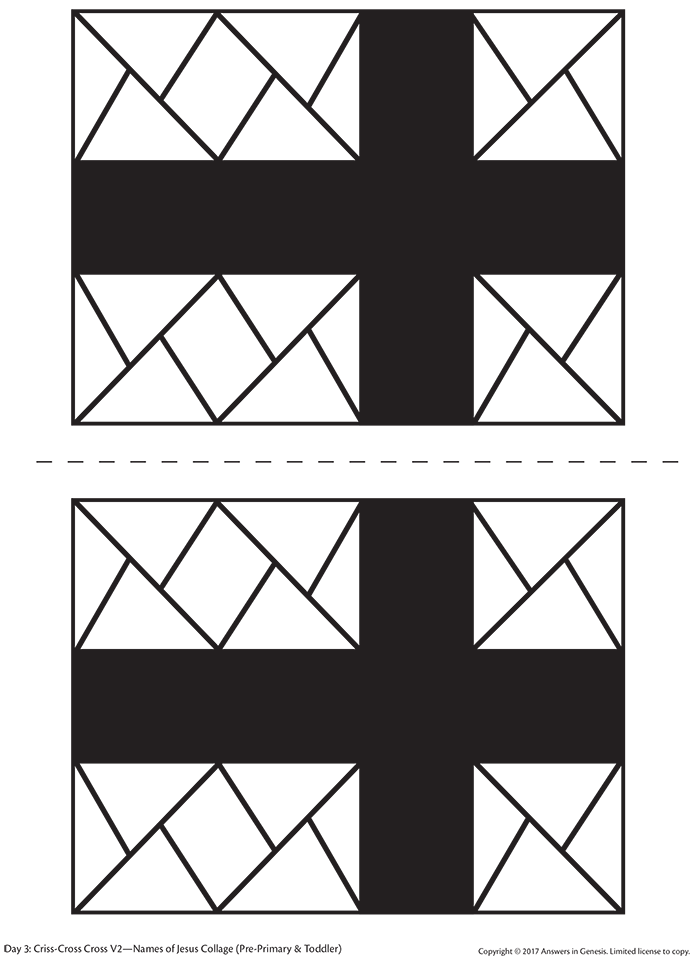
- Cross pattern (Download below)
- White card stock, 1 sheet for every 2 children
- Black or brown yarn, 9 feet per child
Tools and Basic Supplies
- Office paper cutter or utility knife and straight edge (adults only)
- Scissors
- Transparent or masking tape
- Glue sticks
- Neon highlighters
Pre-Prep
- Using a paper cutter, or utility knife and straight edge (adults only), cut cardboard into 4½x6-inch pieces, 1 per child.
- Photocopy the cross pattern onto white card stock and cut out one per child.
- Cut the yarn so each child will have one 5-foot long piece and one 4-foot long piece.
Teaching Tie-In
What shape is on our craft today? Take responses. Yes, it's a cross! What does a cross have to do with Jesus? Take responses. Aren't you so thankful Jesus loved you so much he came and even died on the cross to take your sins away?
Class Time Directions
- Color the stained glass portion of the cross pattern.
- Glue the colored cross pattern to the cardboard.
- Take the longer piece of yarn and tape one end to the center of the back of the cardboard. Next, wrap the yarn vertically around the cardboard and over the vertical cross piece five times. Then tape the end to the back of the cardboard.
- Repeat the same process with the shorter piece of yarn, but this time over the horizontal cross piece.
Tip Corner
A scroll saw or band saw works well for cutting corrugated cardboard (adults only).
 Download PDF
 Download PDF
 Download PDF
Time Lab Inventors’ Science & Crafts (Excerpt)
Get ready to launch into hyperdrive at Time Lab, where we’ll discover Jesus from eternity past to eternity future!
Browse Kids Book- © 2025 Answers in Genesis
- Privacy Policy
- Contact
- About