Solid Ground: Snowshoe Experiment
Day Three Experiment: Investigating Earth Foundations in the Arctic
Part Two
on October 9, 2017
Materials

- 9 x 13 pan, 1–2 per table
- 6-inch ruler, 1–2 per table
- Rolls of masking tape, 2 per table
- 5-pound bag of flour, 1 bag for every 3 pans (gluten free option: cornstarch)
- Scissors, 3–4 per table
- Pencils, 3–4 per table
- 8 1/2 x 11 heavy cardstock, 3–4 per table
- Medium to large plastic 4-footed animals, 3–4 per table
- Footprint Pattern (see DVD-ROM or download below), 1 per table
For Part One of this experiment, please see Permafrost Experiment
Day 4 Experiment
- Glass container
- Pitcher of water
Pre-Prep
- Fill a 9 x 13 pan half full with flour. Smooth surface with a ruler.
- Optional: make sets of snowshoes ahead of time rather than having the kids make them to save time.
Snowshoe Experiment
Have you ever played in a big snowfall? Have you put on boots and then run out and sunk down into the snow?
Today, we're going to investigate how to walk more successfully on layers of snow. Walking on snow in the Arctic can be hard work for people and animals, no matter if the snow is packed or powdery. Snow isn't a stable foundation. God designed many of the Arctic animals with special paws and hooves that help them walk easier without sinking too deeply. People have studied these animals and have made snowshoes for themselves that use the same principles. In fact, people have used snowshoes in the Arctic for thousands of years.
To do your experiment, you need to know a very important scientific term. It's called PSI, which stands for pounds per square inch. Snowshoes are designed thinking about the amount of pressure a body's weight puts on each square inch of snow. The greater the pressure, the deeper the person sinks into the snow. Snowshoes are made bigger than regular shoes and boots, so they spread the person's body weight over a large area. That way the feet won't sink completely into the snow. Your challenge is to create some snowshoes that will reduce the sinking of the plastic animals at your table. I'm going to talk you through some steps for this experiment, so here we go!
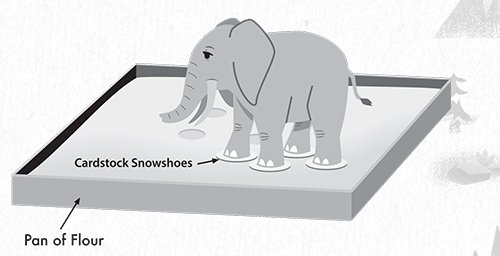
- Stand your plastic figure gently on the flour in the pan.
- Now, remove the figure and observe how deep the footprints are.
- Next, using the cardstock and scissors, cut out your first set of snowshoes for the figure. The two basic shapes used in the Arctic are "teardrop/raindrop" shape and "wide oval/bear paw" shape. Choose one of the shapes to use for the entire experiment. Your set should have a snowshoe for each foot or paw. You can look at the Footprint Pattern (see below download), choose a shape, draw the shape on cardstock to fit your animal's feet, and then cut out the footprints.
- Tape the snowshoes to the feet.
- Use a ruler to spread the flour and smooth it out again.
- Stand the plastic figure again gently on the flour.
- Remove the figure and observe how deep the snowshoe prints are.
- If time, try the activity again with a bigger set of snowshoes, but remember to keep the shape the same.
- Push the feet down into the flour without the snowshoes. Then, using the same pressure, try it again pushing the feet with the snowshoes into the flour. Notice any difference in how it feels trying to push the feet into the flour.
- Is there any relationship between the size of the snowshoe and the depth of the hole? Did the snowshoes in your experiment help your animal not to sink as deeply? Was the sinking less and less as you made larger and larger snowshoes? As we said earlier, God has created animals with the ability to not sink because of the size of their paws. God thought of everything when He made these amazing creatures!
Pre-Prep for Day 4
- Fill a glass with water and then carefully place in the freezer. See where the top of the water is and compare that to the level of the ice in the frozen container on Day 4. Mark where the level of water is on the glass.
Related Downloads
Day 3 Experiment: Footprint Patterns
PDF DownloadRecommended Resources
- © 2024 Answers in Genesis
- Privacy Policy
- Contact
- About


