
Kids Mode
This will turn off kids mode. Are you age 13 or older?
Bonzer Boomerang
Day One Experiment
on November 24, 2021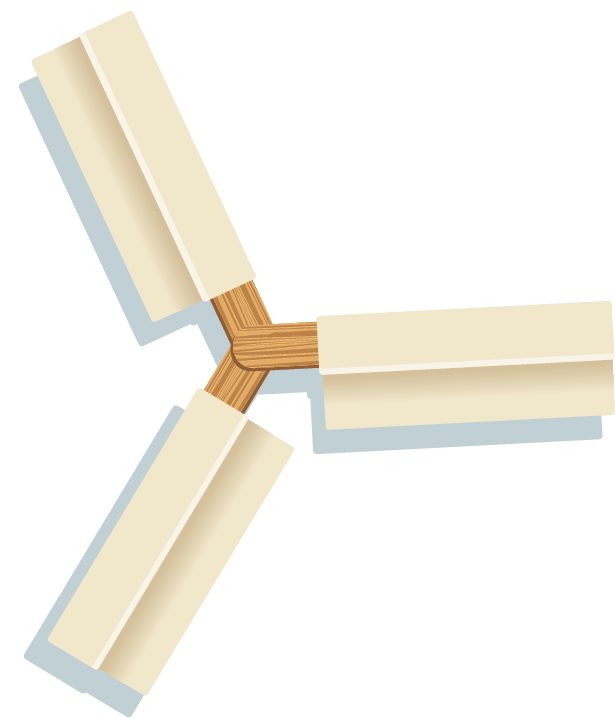
Materials
- Boomerang Pattern
- 6-inch tongue depressors, 4 per child (3 for the frame, 1 for a folding guide)
- 8 additional tongue depressors or craft sticks for the frame template
- 110# cardstock, any color or colors
- Hot glue gun (adults only)
- Tape, several pieces per child
- Pen or pencil
- Optional: picture of an airfoil
Pre-Prep
- Cut the cardstock into 5 ⅛ x 2 ⅜ rectangles. Each child needs three. If you are working with kids who are second grade or lower, pre-prep their airfoils. If you are working with older kids (3rd grade and up), have them make their own. Directions for making the airfoils are given in Class Directions #1.
- Prepare one frame template, which will then be used to make all the students’ frames. Tape three craft sticks together in one stack and five together in another stack, then tape them on to the Boomerang Pattern.
- Now it is time to make the kids’ frames on top of that. For each child’s frame, put three tongue depressors on top of the stacks you just made as illustrated on the Boomerang Pattern. Use the hot glue gun to glue the three tongue depressors together at the center meeting point.
- Put a mark or sticker on the center of each frame to identify it as the top side. Continue to make as many frames as needed so each child has one.
- Prepare one or more samples to show (one to hold up or one per table). You may want to have samples of the various steps in the process as well. (This is true of all science experiments.)
Class Time Directions and Dialogue
Listen to these crazy laws that are still on the books:
- Bingo games can’t last more than five hours in North Carolina.
- You may have to pay a fine in Oklahoma if you make faces at someone’s dog.
- In Missouri, you’re not allowed to drive with an uncaged bear in your car.
Well, these are silly, aren’t they? But can anyone think of any real laws people follow? Take responses. Possibilities can include things like observing speed limits, paying taxes, being a certain age to drive, not disturbing the peace, etc.
Did you know people aren’t the only ones who follow laws? God created the universe to follow certain physical laws, too. There’s an entire type of science called physics that’s devoted to the study of these physical laws.
Today, we’re going to learn about some of the physics (physical laws) that make airplanes stay up in the sky, even though gravity is trying to pull them down to earth. Has anyone ever flown in an airplane? Take responses. Ask how they liked it.
Has anyone heard the term “airfoil”? Show the picture of an airfoil if you have one. An airfoil is a structure that has curved surfaces designed to help lift an object when it’s in the air. The curved shape of the wings on a plane causes a lower pressure above the wing and a higher pressure below it. This difference in pressures gives the wings lift, which is part of why the plane stays in the air. It’s also why other flying objects, such as boomerangs, stay in the air.
Boomerangs have been used for thousands of years by the Aboriginal people. Did you know boomerangs were first created to be hunting tools? They could go three times farther than a spear, so they sure came in handy. This wasn’t the only use, however. They were also used to help start fires, dig in the ground, and scrape bark off trees—not to mention they acted as musical instruments and toys. Some boomerangs were designed to return, and others were not. It took intelligence for Aboriginal people to make boomerangs. Aboriginal people were not sub-humans, as evolutionists believed, but were—and are—intelligent people, made in God’s image.
We’re going to make our very own returning boomerangs today, so let’s start by making airfoils.
- Each person will make three airfoils that will eventually go over the three tongue depressors that make up their boomerang frame. Give each child an extra tongue depressor to use as a folding guide, three rectangles of cardstock, and tape. Apply a strip of tape going down the long edge of one cardstock rectangle so just under half the tape is actually on the cardstock and the rest is not attached to anything yet. Flip the rectangle over so the sticky side is facing up and toward you. Firmly hold a tongue depressor on the cardstock 2 millimeters (approximately) above and parallel to the taped edge as you bend the remaining cardstock up and around, keeping it snug against the tongue depressor. Press the folded cardstock onto the tape and slide out the tongue depressor. Repeat the process until you have three airfoils.
- Now it is time to put the airfoils on the boomerang frame. Remind mates to pay close attention because it is critical that the airfoils are put on the tongue depressors in the proper direction for the boomerangs to work. Hold one of the airfoils with the taped side down. For mates that are right-handed, the pocket needs to be on the right side, and for those who are left-handed, the pocket needs to be on the left side. Before sliding the airfoil onto the tongue depressor, ensure that the taped side is facing down! Check that the frame is facing up and then slide the airfoils as far as they go onto the blades of the frame. Use tape to fasten the paper to the frame.
- Repeat the same steps to attach the other two airfoils.
- Remind the mates that boomerangs are only to be thrown outside.
Now, let’s look at one of your airfoils from the side. Do you see how the pocket end is thicker than the tail end? Pause. We discussed how the airfoil shape gives lift, but we haven’t talked about what makes a boomerang come back yet. Take a look at your frame. You should see a mark in the center that means it’s the top side. The reason why that matters is because if you look carefully, the blades on the top side bend up just a tiny bit. Can you see that? This angle is called a dihedral angle, and it’s what makes your boomerang curve and come back to you. So the airfoil is what helps keep the boomerang in the air and the dihedral angles on your frame are what make the boomerang come back to you!
Show mates how to throw a boomerang and remind them again to throw them only outside. To throw a boomerang, hold it between your thumb and the side of your index finger. Bend your wrist back so the boomerang almost touches your arm. Angle the blades at what would be one o’clock. If you are left-handed, angle toward eleven o’clock. If you are outside, flick your wrist and throw it. It should come back to you, so watch out!
Tip Corner
- This particular experiment is a little more complicated than any of the others, but is worth doing. The kids at the test churches loved it!
- If you do not have 110# weight cardstock, substitute heavy duty file folders.
- There are a lot of great videos online about how to throw a boomerang correctly. Consider showing one to the class.
- If you have time, go outside and have the kids take turns throwing.
- Two science terms introduced today are airfoil and dihedral angle.
Zoomerang Turtle-y Terrific Science & Crafts
Kids love science experiments and crafts! This guide contains everything you need to coordinate the daily science experiments and crafts for all age groups.
Browse Kids Book- © 2024 Answers in Genesis
- Privacy Policy
- Contact
- About