
Kids Mode
This will turn off kids mode. Are you age 13 or older?
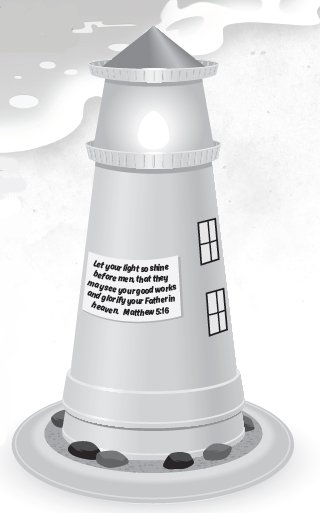
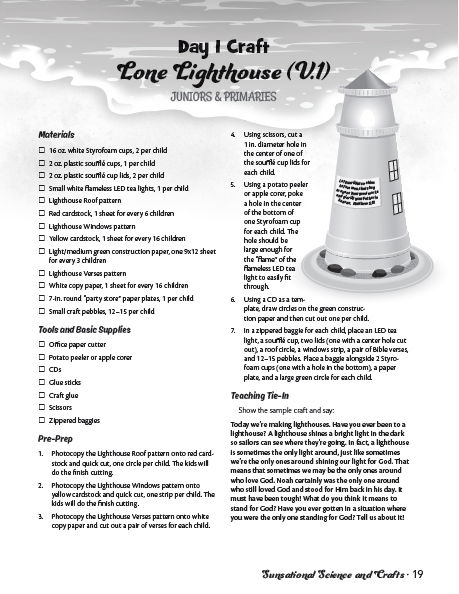
Lone Lighthouse: Primaries and Juniors
on May 16, 2016Materials
- 16 oz. white Styrofoam cups, 2 per child
- 2 oz. plastic soufflé cups, 1 per child
- 2 oz. plastic soufflé cup lids, 2 per child
- Small white flameless LED tea lights, 1 per child
- Lighthouse Roof pattern
- Red cardstock, 1 sheet for every 6 children
- Lighthouse Windows pattern
- Yellow cardstock, 1 sheet for every 16 children
- Light/medium green construction paper, one 9x12 sheet for every 3 children
- Lighthouse Verses pattern
- White copy paper, 1 sheet for every 16 children
- 7-in. round “party store” paper plates, 1 per child
- Small craft pebbles, 12–15 per child
Tools and Basic Supplies
- Office paper cutter
- Potato peeler or apple corer
- CDs
- Glue sticks
- Craft glue
- Scissors
- Zippered baggies
Pre-Prep
- Photocopy the Lighthouse Roof pattern onto red cardstock and quick cut, one circle per child. The kids will do the finish cutting.
- Photocopy the Lighthouse Windows pattern onto yellow cardstock and quick cut, one strip per child. The kids will do the finish cutting.
- Photocopy the Lighthouse Verses pattern onto white copy paper and cut out a pair of verses for each child.
- Using scissors, cut a 1 in. diameter hole in the center of one of the soufflé cup lids for each child.
- Using a potato peeler or apple corer, poke a hole in the center of the bottom of one Styrofoam cup for each child. The hole should be large enough for the “flame” of the flameless LED tea light to easily fit through.
- Using a CD as a template, draw circles on the green construction paper and then cut out one per child.
- In a zippered baggie for each child, place an LED tea light, a soufflé cup, two lids (one with a center hole cut out), a roof circle, a windows strip, a pair of Bible verses, and 12–15 pebbles. Place a baggie alongside 2 Styrofoam cups (one with a hole in the bottom), a paper plate, and a large green circle for each child.
Teaching Tie-In
Show the sample craft and say:
Today we’re making lighthouses. Have you ever been to a lighthouse? A lighthouse shines a bright light in the dark so sailors can see where they're going. In fact, a lighthouse is sometimes the only light around, just like sometimes we’re the only ones around shining our light for God. That means that sometimes we may be the only ones around who love God. Noah certainly was the only one around who still loved God and stood for Him back in his day. It must have been tough! What do you think it means to stand for God? Have you ever gotten in a situation where you were the only one standing for God? Tell us about it!
Class Time Directions
- (Optional) Using scissors, cut the outer lip from the paper plate.
- Flip the plate over so the white underside (the bottom) is facing you. Then glue stick the large green circle to the center of the plate.
- Take the Styrofoam cup without the hole in the bottom and apply a bead of craft glue to the top rim. Then turn it upside-down and carefully center and press onto the green circle. There should be an even band of green around the outside of the cup.
- Arrange your pebbles along the green band and glue into place with craft glue.
- Take the plastic lid with the hole in it and snap it onto the soufflé cup.
- Apply a bead of craft glue to the bottom rim of the other Styrofoam cup (the one with the hole in the bottom). Then turn the plastic soufflé cup upside-down and carefully center and press the lid onto the bottom of the cup.
- Apply a small pool of craft glue to the bottom of the soufflé cup. Then take the other plastic lid, turn it upside-down, and carefully center and press it onto the bottom of the soufflé cup.
- Cut out the roof circle. Then cut along the line to the center of the circle. Then overlap the ends to form a cone and glue stick together. The roof cone should be sized to fit snuggly inside the upside-down plastic lid.
- Apply a bead of craft glue around the inside edge of the upside-down plastic lid. Then press the roof cone into the glue.
- Cut out the Bible verses and each of the windows and glue stick to the outside of the second cup below the soufflé cup.
- Now assemble your lighthouse. Turn on the LED tea light and place it on top of the first Styrofoam cup. Then carefully slide the other cup over top of the first cup so the tea light pokes through and lights up the soufflé cup.
Tip Corner
- Pour craft glue into soufflé cups, for every 2 children, and use craft sticks cut in half to spread it.
- To save class time, cut out the roof circles and windows completely.
- Just a reminder—make sure all pre-prep tools and basic supplies that could be dangerous to children, such as a paper cutter, are put safely away before VBS.
 Download PDF
- © 2024 Answers in Genesis
- Privacy Policy
- Contact
- About