Kids Mode
This will turn off kids mode. Are you age 13 or older?
Great White Game
Day Three Extra Craft
on February 7, 2022Materials

- 12-oz. gray paper party cups, 1 per child
- Large wiggle eyes, 2 per child
- Shark Fins Pattern
- Gray card stock, 1 sheet for every 8 children
- White copy paper, 1 sheet for every 8 children
- String, 18 in. per child
- Wood beads (12 mm or larger), 1 per child
Tools and Basic Supplies
- Glue sticks
- Craft glue
- Glue dots
- Scissors
- Pinking shears
- Transparent tape
- 1⁄4-in. hole punch
Pre-Prep
- Cut cording into 18-in. pieces, 1 per child.
- Photocopy the Shark Fins Pattern onto gray card stock, then cut out 3 triangles per child.
- Cut copy paper into 1-x-2-in. rectangles, 5 per child. Then use pinking shears to make jagged “shark teeth” along one long side of each rectangle.
- Hole punch each cup, on the seam, just below the rim.
Class Time Directions
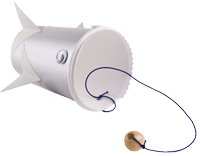
- Take one of the gray triangles and fold in half along the middle dashed line. Then fold the corners (“B” sections) back along the outer dashed lines. Then glue stick the “A” sections together to make a dorsal fin for your shark.
- Use the same procedure for the other 2 gray triangles, which will be the side (pectoral) fins.
- Use craft glue to attach the 3 fins to the cup. The dorsal fin should be placed at the bottom, directly opposite the seam. The pectoral fins should go on either side of the dorsal fin, but about 1 inch higher on the cup.
- Use glue dots to attach 2 eyes above the dorsal fin, an inch or so below the rim of the cup.
- Tie one end of the string to the cup, using the hole that’s just below the rim. Tie the other end to the wood bead.
- Now add shark teeth. Take the jagged edge strips (shark teeth), and tape or glue them, one at a time, around the inside rim of the cup.
Tip Corner
Make craft kits for each child by putting all of their materials inside their gray cups.
Related Downloads
Shark Fin Pattern
PDF DownloadMystery Island Deep Sea Science & Crafts
Kids love science experiments and crafts! This guide contains everything you need to coordinate the daily science experiments and crafts for all age groups.
Browse Kids Book- © 2025 Answers in Genesis
- Privacy Policy
- Contact
- About

