
Drawing Lesson I: How to Draw the Six Days of Creation for Kids - Part I
Lessons
- Drawing Lesson I: How to Draw the Six Days of Creation for Kids - Part I
- Drawing Lesson I: How to Draw the Six Days of Creation for Kids - Part II
- Drawing Lesson II: Teaching Children Concepts of Creation
- Drawing Lesson III: How to Draw a Dinosaur
- Drawing Lesson IV: What Happened to God’s Perfect Creation?
- Drawing Lesson V: Two Trees of the Gospel
For the next six weeks we will share a number of step by step drawing lesson/presentations for teaching children some important concepts about Biblical creation.
Drawing skill level:
These presentations are designed to be very simple to draw so you don’t have to be an artist to present them. They are also simple enough for kids to draw along with you on their own sheets of paper.
These lessons can be presented to an audience using an overhead projector, chalkboard, or markerboard.
The first presentation in this series is given to you in two parts. It is a simple method of teaching the order of the six days of creation so children (and adults too) will remember them. Click here to view the second lesson.
An accompanying animation demonstrates the drawing progression for this lesson.
1. Page set up
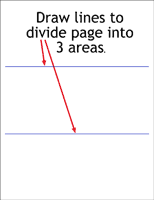
Divide one page/overhead into three equal areas using two horizontal lines. Explain that these three areas will be used to illustrate the events of the six days of creation.
2. Day One (Genesis 1:1–5) - The top area on the page/overhead.
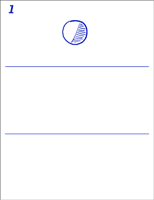
Write a number 1 in the upper left corner of the top area. This is for creation Day One.
On Day One, we will show 3 main things God created:
Space -Explain that the top area on the page represents the space God created to place His creation into.
Earth- Draw a small - medium sized circle in the middle of the top area. Explain that this circle is the Earth. There was nothing else in all of space, just the Earth.
Light - God said, "Let there be light", and there was light. Instead of drawing a beam of light, just draw darkness on half of the Earth, showing that it is being hit by light. This light and darkness (and a rotating Earth) gave us the first day and night.
3. Day Two (Genesis 1:6–8) - The middle area on the page/overhead.
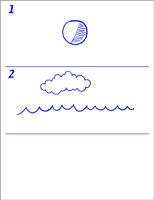
Write a number 2 in the upper left corner of the middle area. This is for creation Day Two.
On Day Two, we will show God did one main thing: God separated the waters below (covering the entire Earth) from the waters above (the atmosphere).
Waters below- Draw a wavy water line almost all the way across the page just below the upper half of the middle section. This is the surface of the water that covered the entire earth.
Waters above- Next, draw a cloud above the water line. This represents the atmosphere that surrounds the earth.
4. Day Three (Genesis 1:9–13) - The bottom area on the page/overhead.
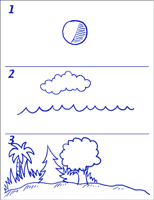
Write a number 3 in the upper left corner of the bottom area. This is for creation Day Three.
On Day Three, we will show God did two main things.
Dry land - God caused the dry land to appear. Draw a bumpy land line across the lower part of the bottom area.
Plants - God created plants. The future food supply for His creation. Draw some simple grasses, bushes, and trees. Keep the right side of this area open because you will be drawing more there later.
We’ll finish this presentation next week in part 2.
Support the creation/gospel message by donating or getting involved!

Answers in Genesis is an apologetics ministry, dedicated to helping Christians defend their faith and proclaim the good news of Jesus Christ.
- Customer Service 800.778.3390
- © 2024 Answers in Genesis